Blog Archives
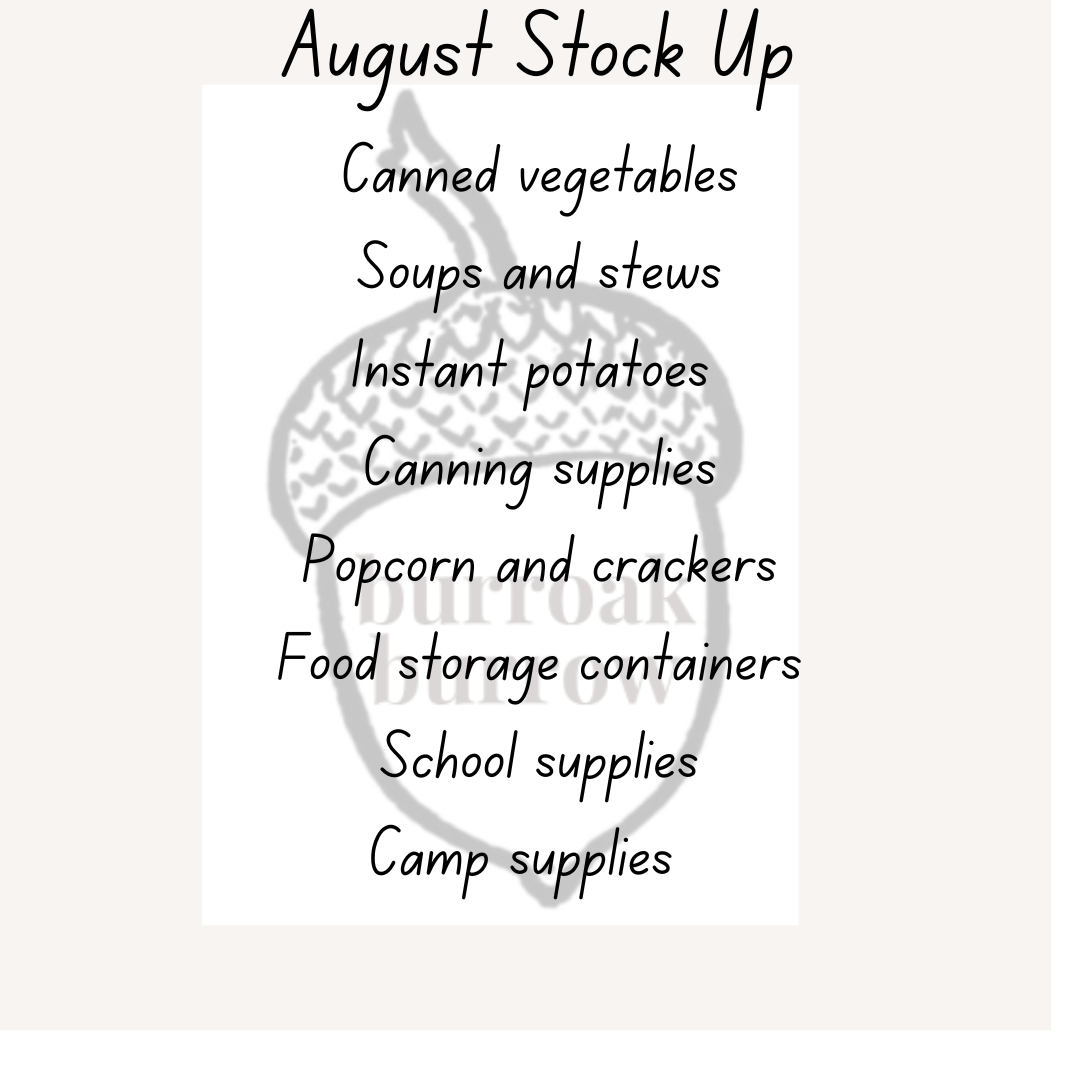
August Stock Up List
August can be a great month to stock up! There’s lots of back to school sales, so quick easy meal deals are plentiful (think instant potatoes, macaroni and cheese etc), dorm supplies like shelving and various containers are on sale too.
As summer is coming to a close, we start seeing clearance pricing on things like tents, cylinders of propane for camp stoves and all sorts of camping and outdoor living items. Keep your eyes out for great deals! Let me know what you score 🙂

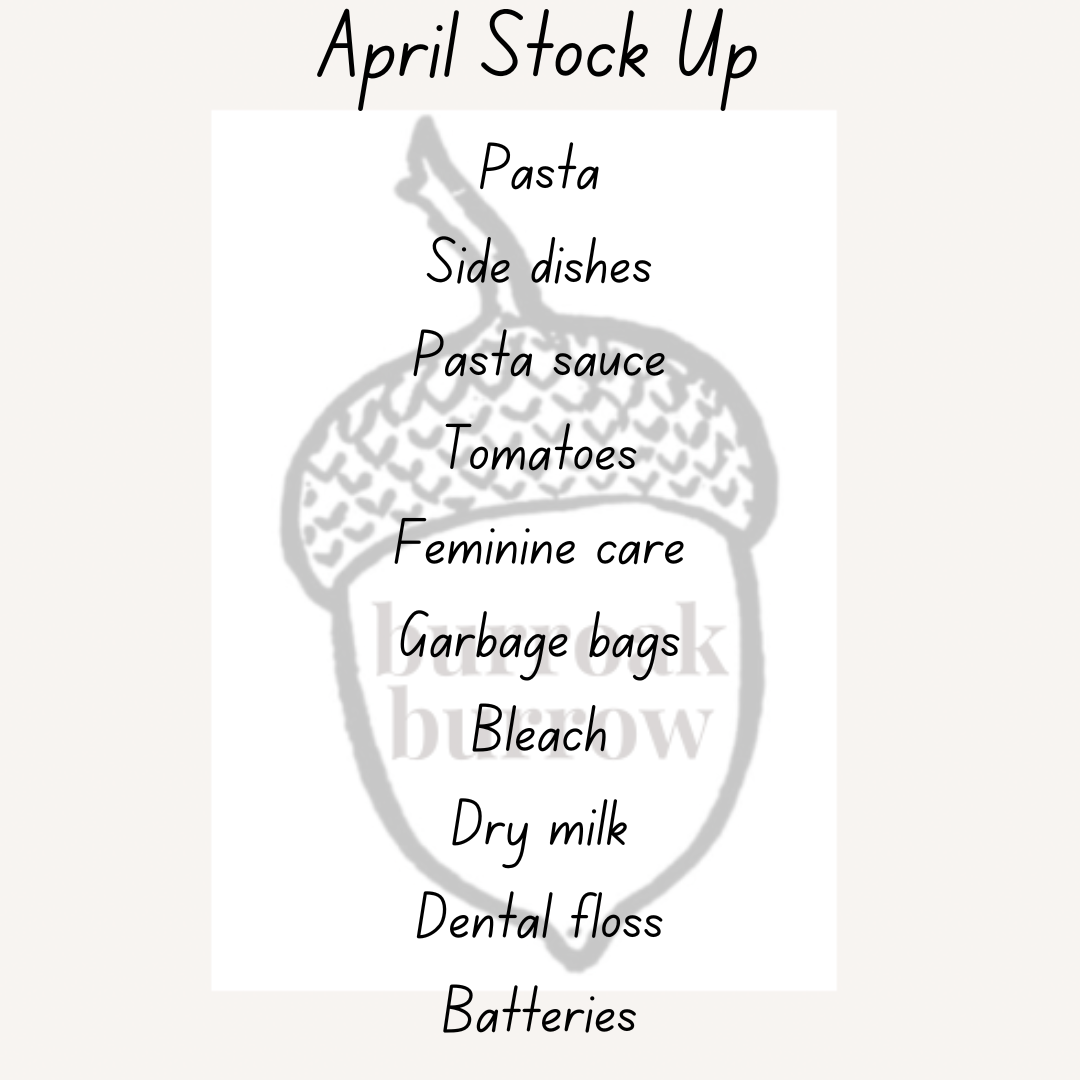
April Stock Up
Welcome to April!
This month we have a solar eclipse! Some local governments are recommending caution due to large crowds and issues that can come with them. They’ve recommended having extra groceries, a full gas tank and other basics like that. I think most like minded individuals have these things anyways, but be cautious (as always) and if you watch the phenomenon make sure you protect your eyes!
April is when we start spending more time outside so I am also making sure I have things like sunscreen, garden supplies and seeds, and of course things like chalk and bubbles. Our foraging will also increase in April.
Make sure to keep an eye out for the following things on sale:

March Stock Update
March is nearly over! I hope everyone has had a good month full of celebrations. I’m so thankful to have a long weekend with my family.
I didn’t buy much on this stock up as any extra went towards the holiday meals and garden supplies (which count as stocking!). Here’s a quick example of some of the stuff I picked up.

The beans and lentils are quite cheap if you buy them dried and they last for a really long time if you store them properly. They’re even cheaper if you buy them in bulk, but little bags like this are perfect to pick up every time you shop as they’re only a couple dollars and they add to your stock quickly.
I like to buy our over the counter medications so that I have an open one, one on the shelf and one extra to put up then rotate through as they get used up. That way I never have to panic and run to an all night pharmacy when the kids wake up sick.
I use the same stocking system when it comes to other non perishables, such as the cleaning supplies I bought for March spring cleaning.
Its beginning to look like a greenhouse in my living room (the only place with good lighting) with seedlings and pots of dirt everywhere. I’ve also started foraging for early spring plants as they’re popping up everywhere and in large, sustainable amounts.
What did you get up to in March? Have you started seeds? Did you take advantage of the sales related to the holidays? Do you now have pounds and pounds of chocolate?
Make sure to follow us on social media to keep up with everything that doesn’t necessarily make it to the blog!
February Stock Up Update
Even with an extra day, February went quick around here. The stock up list was smaller in February than January, so I managed to stock up on more of the list.
I got oats and breakfast cereals on sale. The oats were repackaged into mylar for long term storage. Cereal never lasts long in this house.
I took GG’s pancake recipe (here) and froze a bunch for school day breakfasts. Of course I made sure I had extra syrup.
The price of coffee seems to be different every week, and not in a good way, so I grabbed the first sale I found (and it still wasn’t a great price). I also grabbed a large bag of rice that was featured for Lunar New Year.

Check back tomorrow to see March’s stock up list.

February Stock Up
Welcome to February!
Did January just zip by for anyone else? Pretty sure I just blinked and it was gone.
February’s stock up list is smaller than January’s and is mostly holiday driven. We’ve got Valentine’s day, Fat Tuesday and Lunar New Year specials to keep an eye out for.
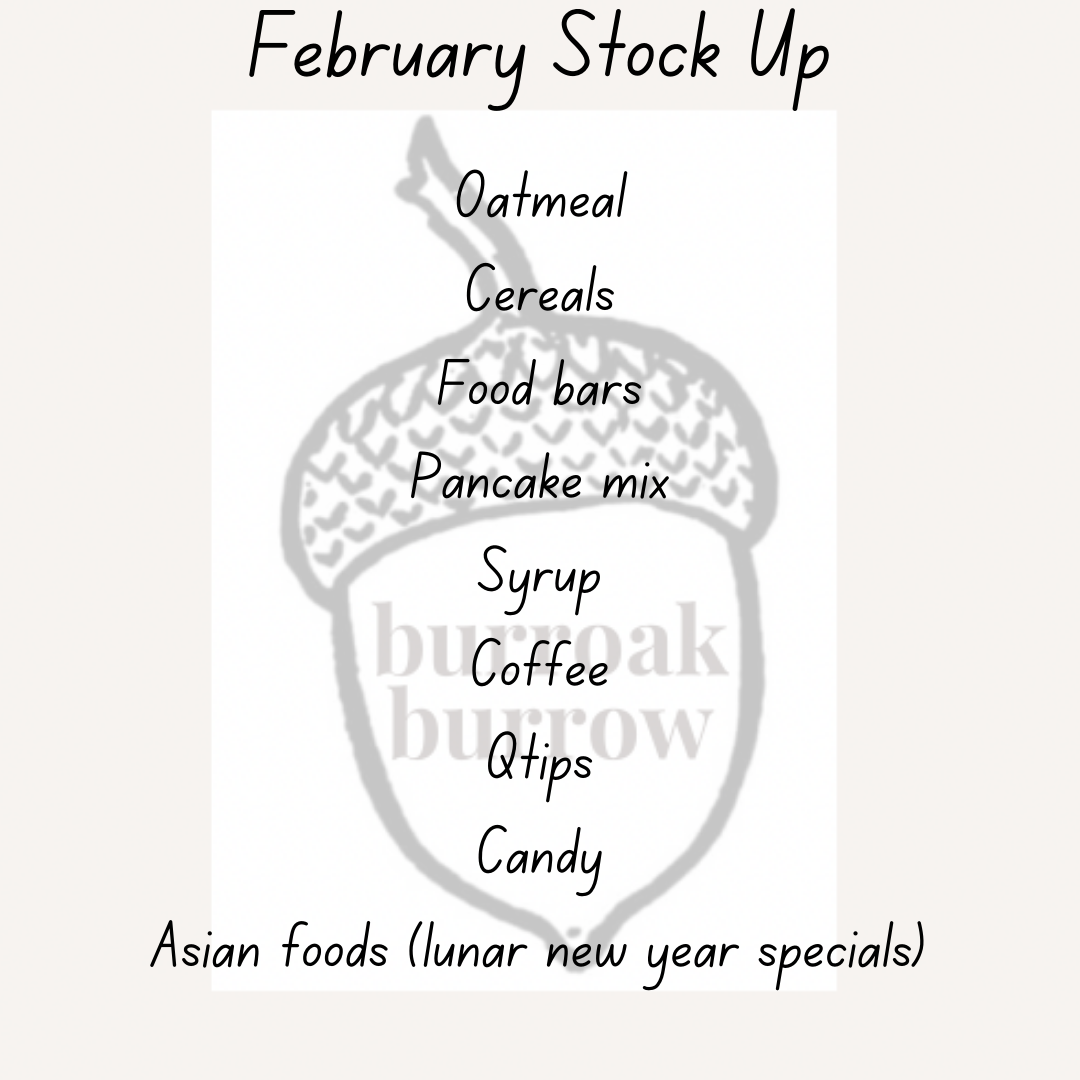
We’ve got oatmeal and breakfast cereals as well as food bars (think nutri grain and granola bars) heading up our list. Oats especially keep for long periods of time if stored properly and can stretch out anything that has ground meat pretty cheaply.
Pancake mixes and syrups are of course on sale for Pancake Day (Fat Tuesday) which falls on the 13th this year. Mixes make whipping up these treats easy and quick. Just a note though, if you get the ‘add water’ only type mixes they may not keep as long as other mixes as they contain additional fats that can go rancid. These are best for regular rotation in your pantry, not a long term storage option. Syrups are a quick source of sugar and energy as well as being a good treat for morale in an emergency. (I think we all know that real maple syrup is better for us than the artificial stuff but the price is right on the latter. Choose what is best for your family)
Coffee often goes on sale in February however this year it seems like coffee prices have skyrocketed, so make sure you watch for sales. No one wants to be uncaffeinated. (Want to know more about storing coffee long term? Read here)
Candy! Valentine’s is all about the sweets. I’m personally hoping to get a bunch of cinnamon hearts which I will vacuum seal in mason jars. This will keep them fresh for a long time. You can do the same with other candies and keep in a cool, dry place for optimum storage. Keep an eye out the day after for half price sales.
Lastly Lunar New Year (February 10th in 2024) is a great time to stock up on Asian staples like rice, noodles and teas. Spices, cooking oils and produce are often on sale as well. And keep in mind, most Asian grocery stores sell butane for small stoves, not bad to have on hand.
Let me know what you’re stocking up on this month!

Seed bombs!
Here’s a fun little project you can do with your little preppers! Seed bombs are little balls made of seeds and growing medium. The ones we made were clay, soil and seeds.
You need:
4 parts air dry clay (found here)
1 part potting soil
1 part seeds
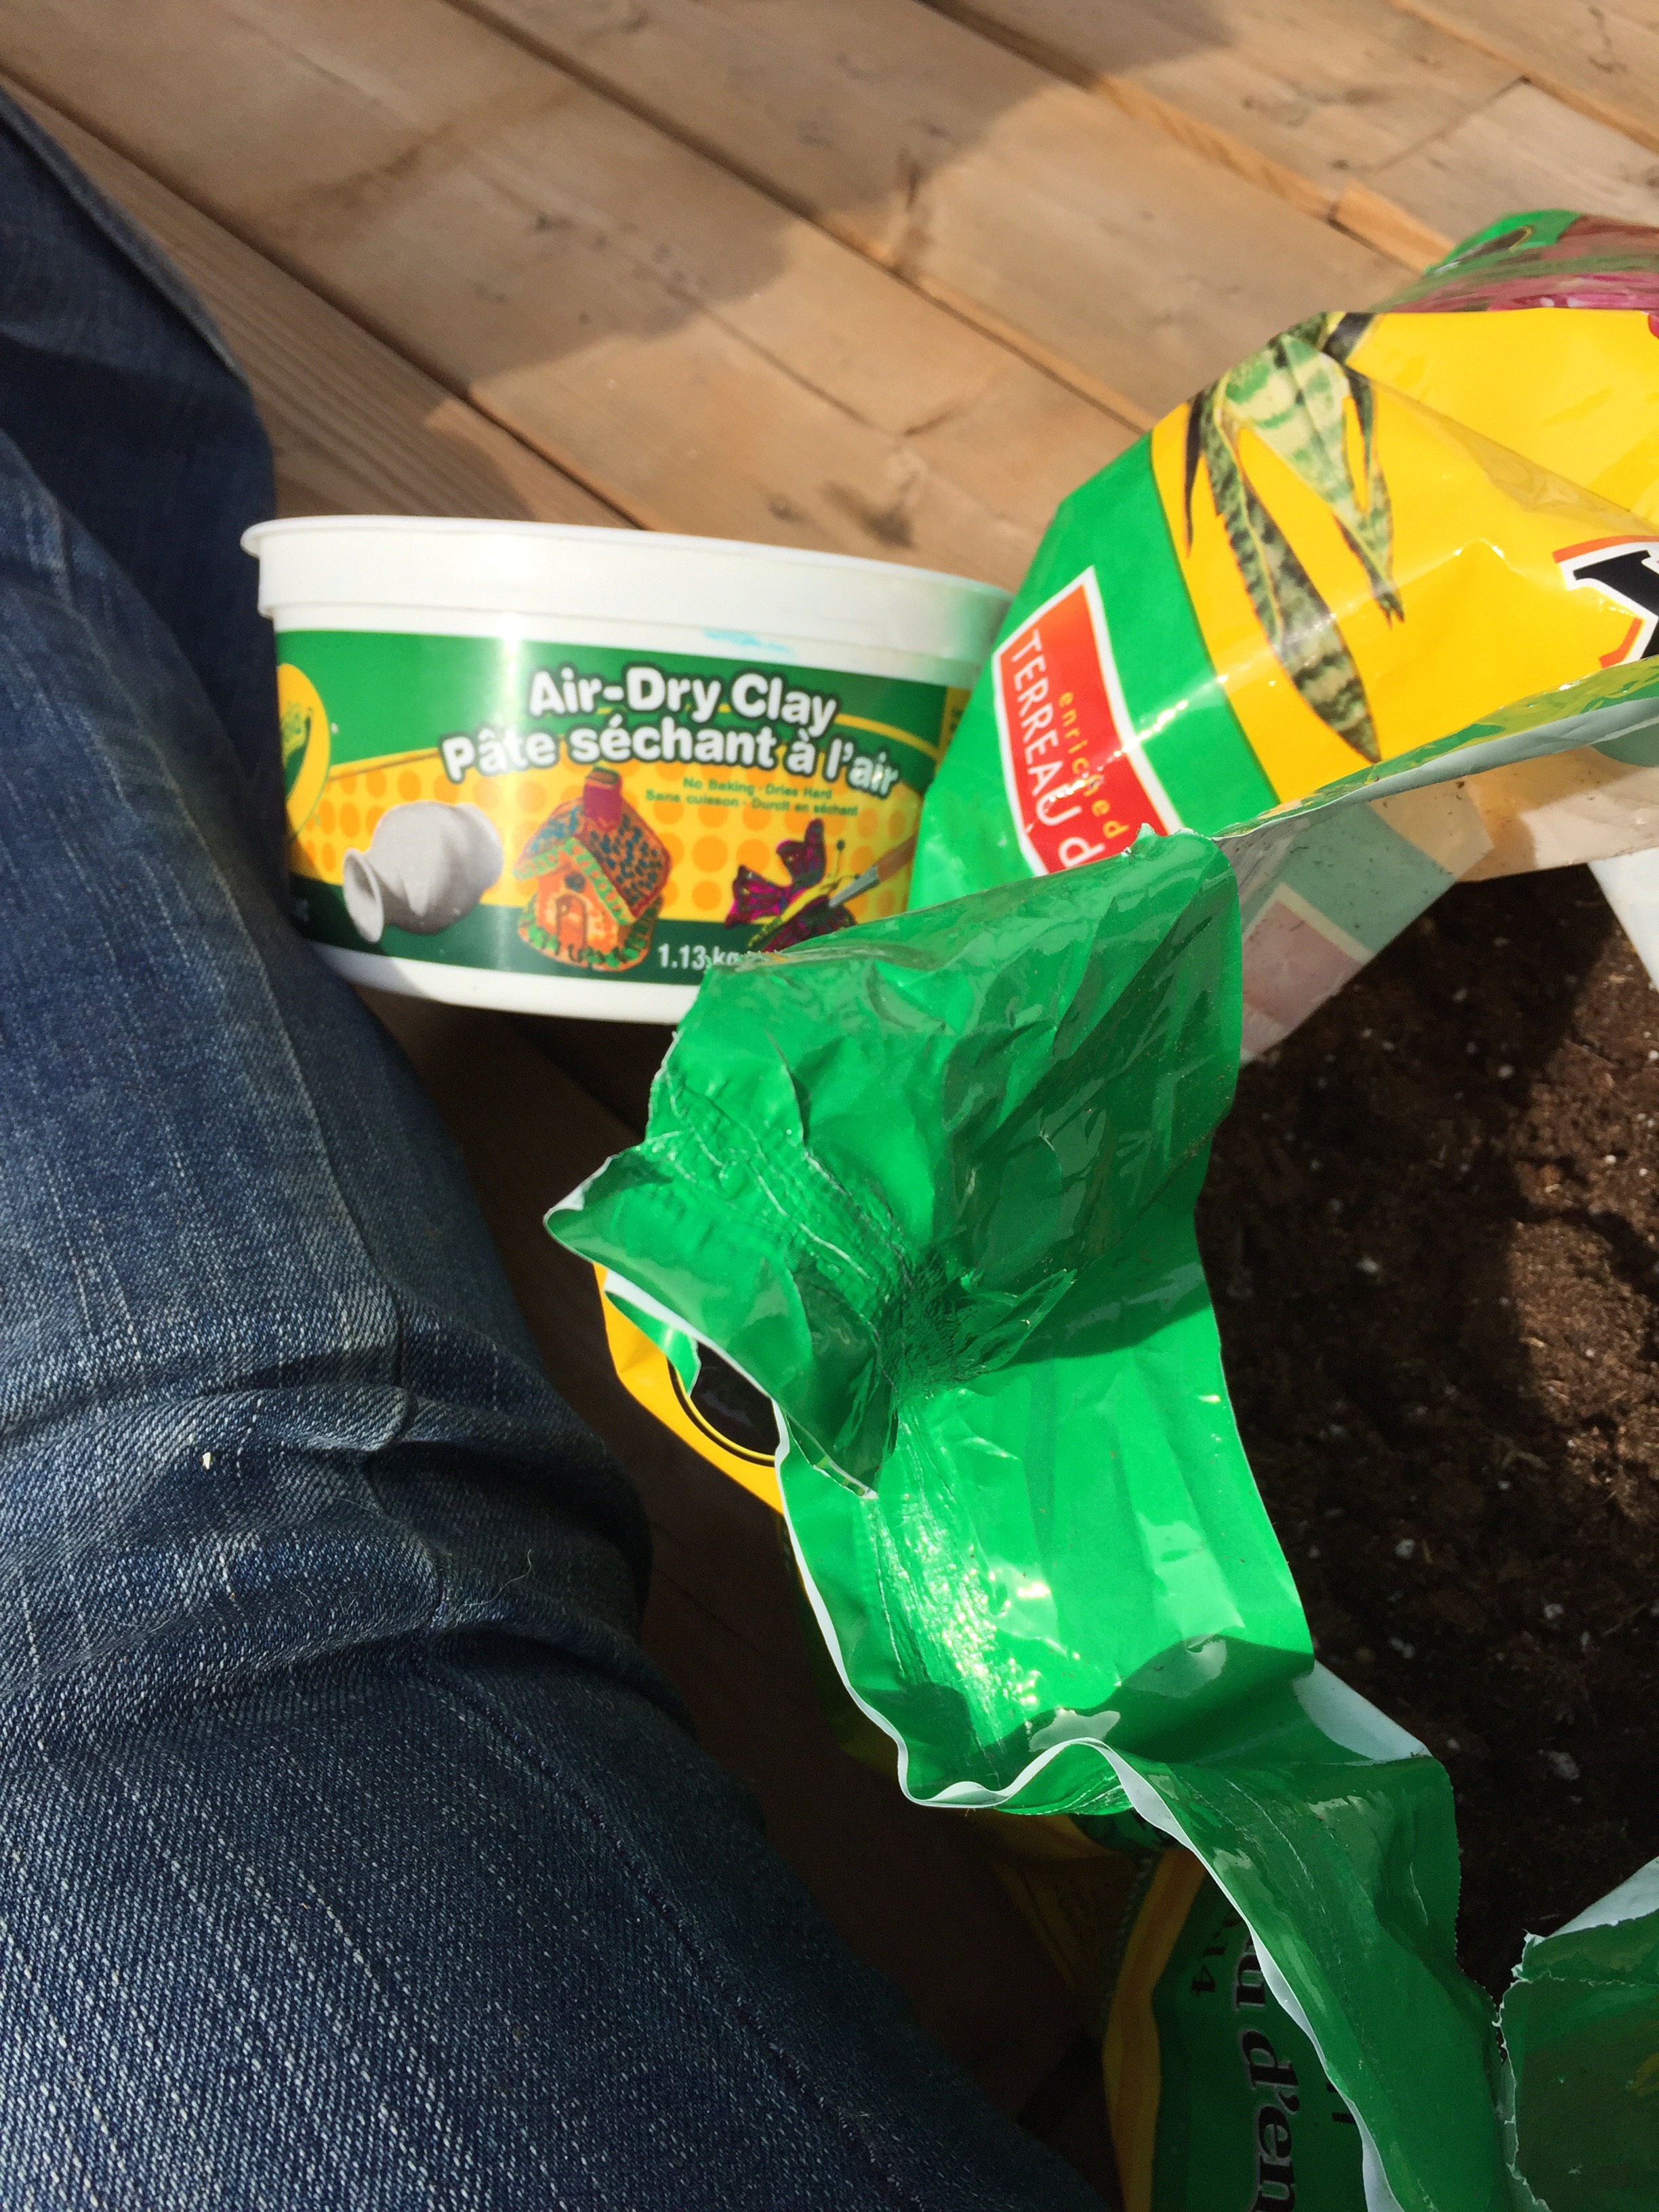
Mix your clay so that its pliable, add in your soil and then add in your seeds. We made two types of seed bombs: one with local edible and medicinal herbs and the other with wild flowers.

Let them dry 24 hours and then spread them around! A great way to beautify (or make usable and an additional prep!) an empty space!
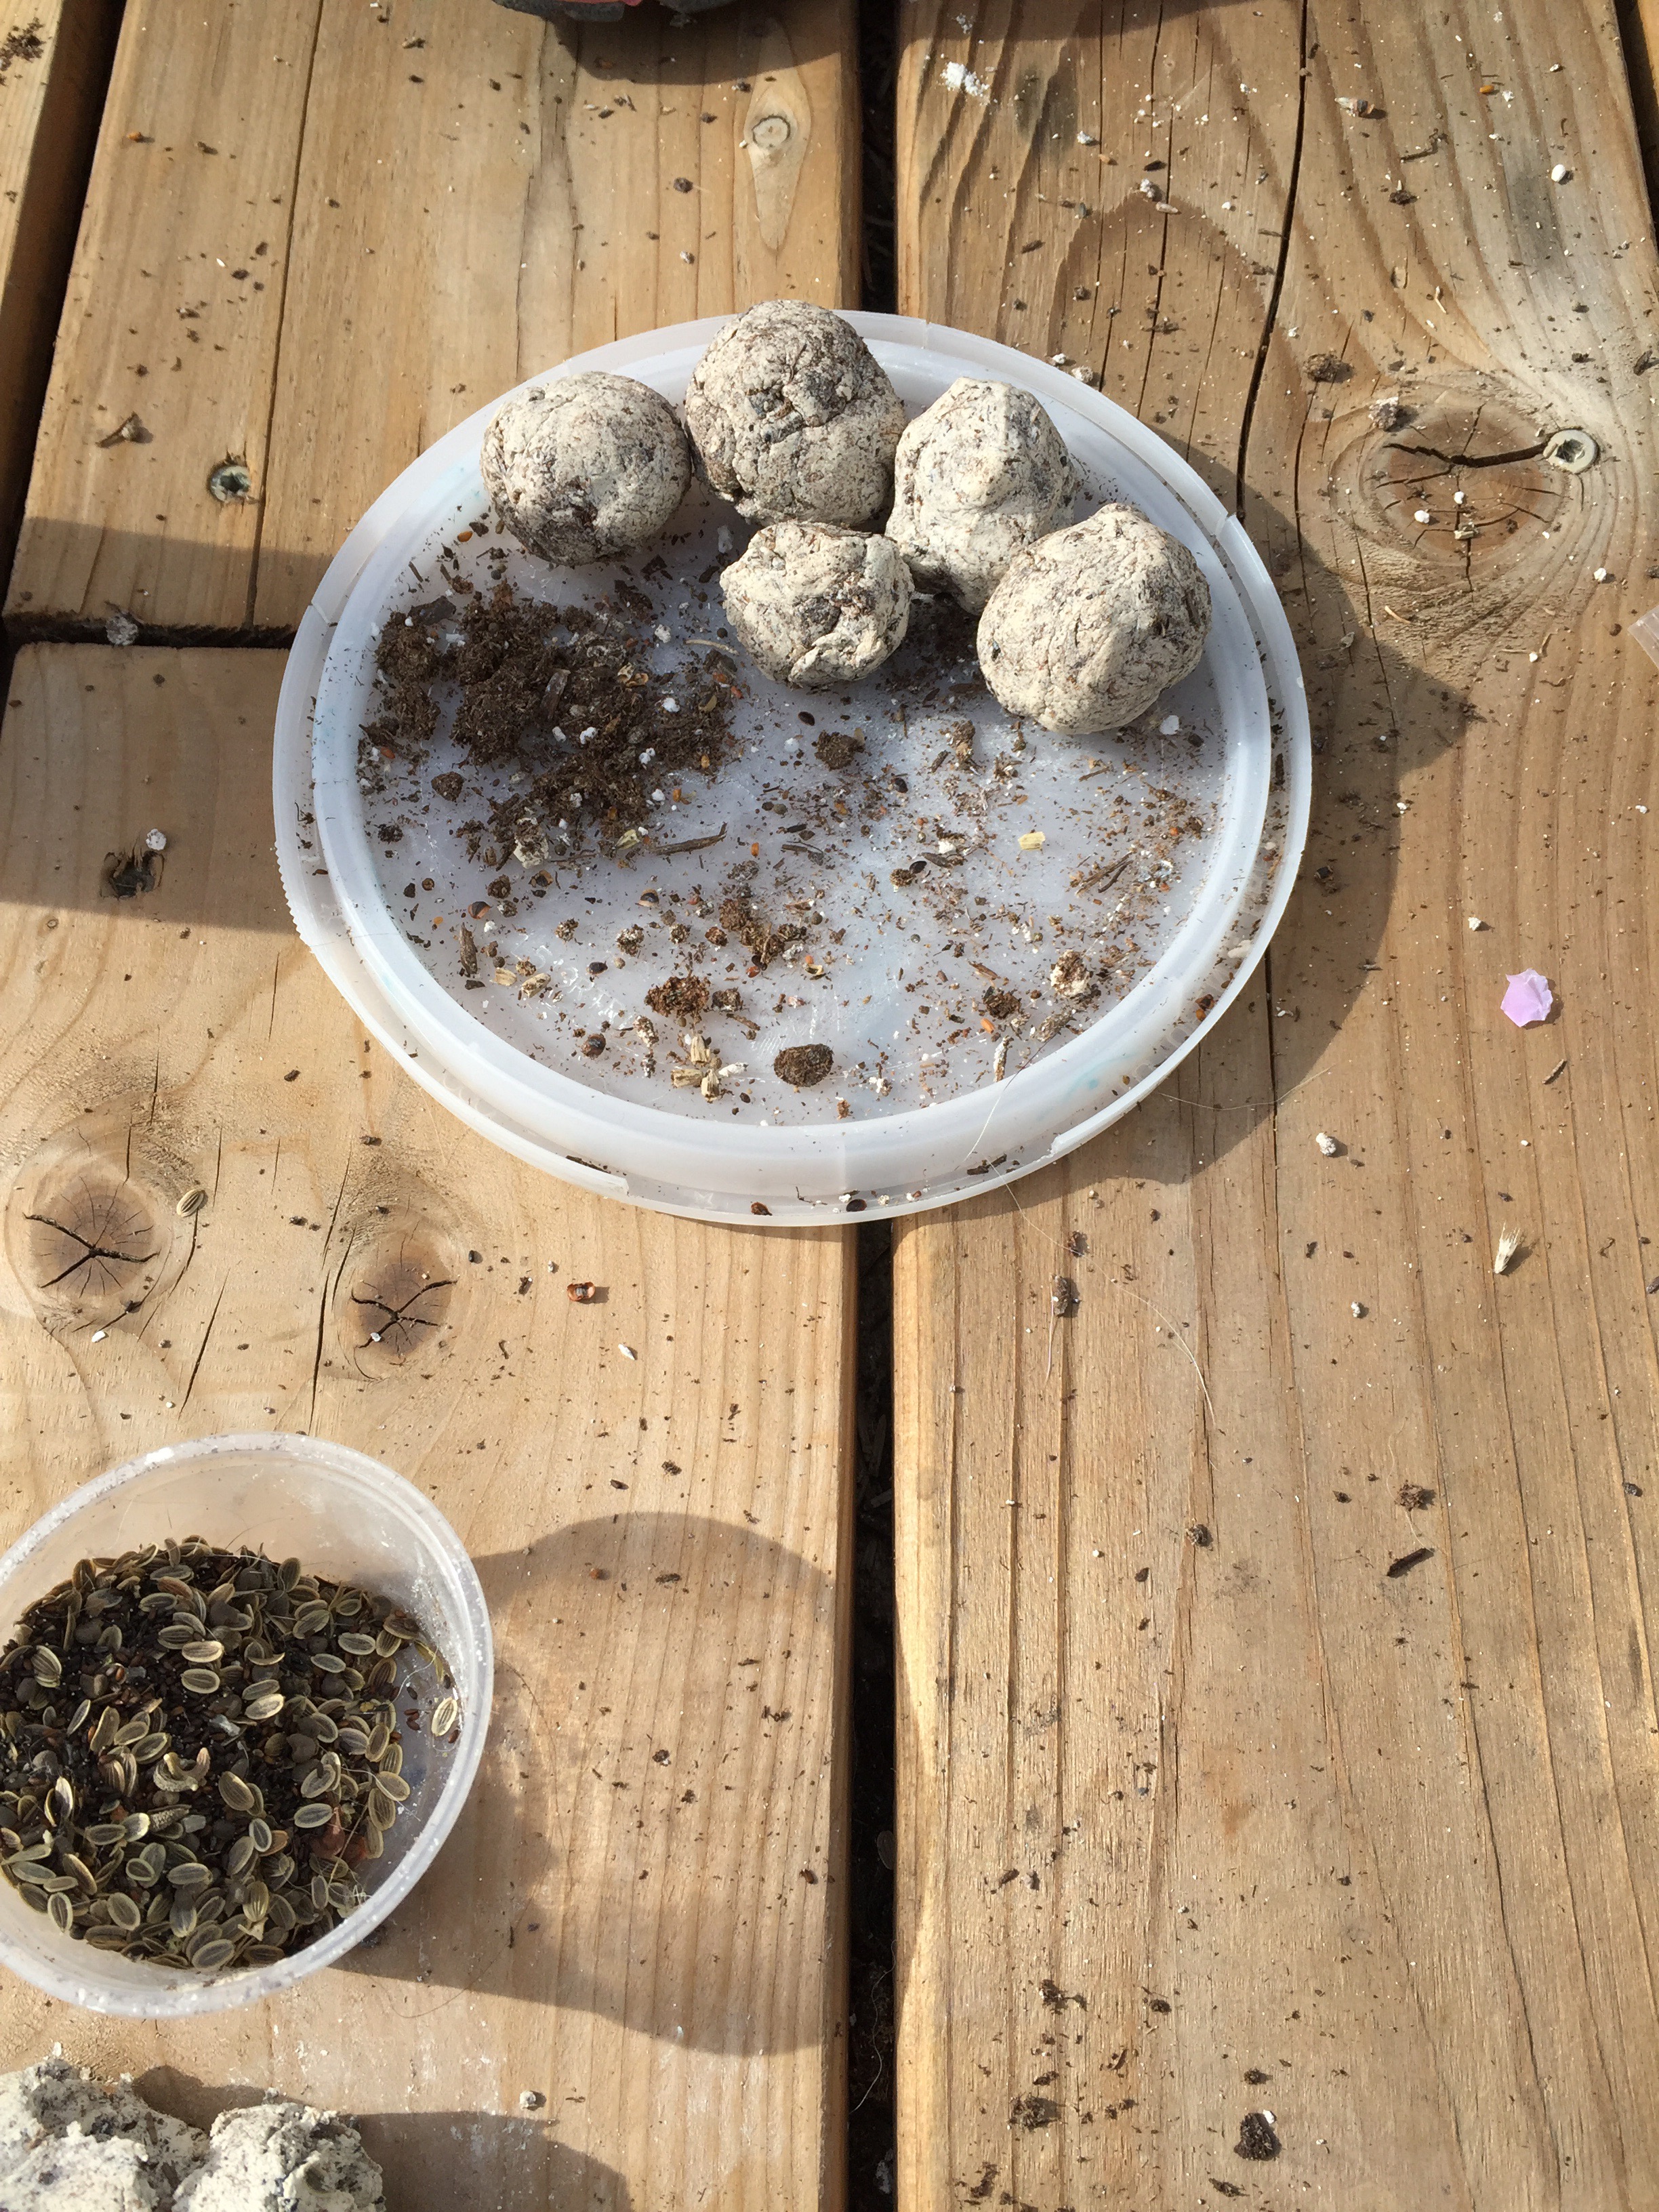 Here’s the ones the kids did!
Love the idea, don’t have the time? These things seem to be popular on etsy and you can find them there (including my shop soon!). Get out there and guerrilla garden!
Prepping for Feminine Hygiene
This is a subject that I haven’t really seen a lot of information on out there so I thought I’d let you all know what I do to prepare for those fun once a month times. Men, you may want to stick around too. (Got women in your family? Need something to barter?)
A while ago, I started a non-profit organization that makes and sends reusable menstrual pads to women in need. Before sending my first package (it went to Africa), I decided I can’t very well send a product that I don’t know anything about so I tried them for myself and never looked back.
The premise is simple. Why fill your valuable shelf space with packages and packages of plastic pads and tampons that you will only use once and then throw away. (Throw away where? Now a days to the dump where your biological material can seep out into the water system- gross. Or after an emergency, well I guess you could burn or bury it). I found a simple pattern online (using an envelope style pad with an insert) and make the pads from donated sheets, pyjamas etc. When done with it, throw it in the wash (or to avoid stains, soak in cold water first).
So, we’re saving space and the environment so far (not to mention the almighty dollar!!) Find a pattern online, sew together some pads and hang on to them. Even if you don’t want to use them now (or you’re a guy, or your daughters are too young) it’s not a bad idea to have a sustainable option for when you might need it. Again, you can barter with these if you don’t need them for yourself. My non-profit runs a program where if you buy one pad, one gets donated (we also just donate anyways but its nice to have a little bit of help in the running costs).
Want to make your own? There’s plenty of free patterns out there and most people have an old flannel shirt or something they can part with.
Not crafty? You can buy reusable pads here and menstrual cups here

Tips for Keeping Up Morale
Life post-SHTF will be very different than what we are used to. Different, harder, crueler and probably nothing like we expect it to be. We will have to deal with boredom (which can be a killer). People in the same environment for extended periods with a loss of privacy, a lack of hygiene, emotional issues, not to mention food fatigue and the digestive problems this can bring on will definitely need something to keep their minds off of things.
All of this is enough to bring anyone down. It is important to keep morale high. Boredom can lead to depression and depression can lead to a loss of will to live. This obviously is counter productive to our survival plans. So:
Give people a job to do, establish a routine. I’ve said it before, people thrive on routines. When you know what to expect and what your day looks like, it makes it easier to deal with.
Make sure you have entertainment. Books, games, decks of cards, coloring books for the kids, anything. If you don’t have a physical source of entertainment, put on a play, sing some songs or have a talent show.
Learn some skills that are fun and productive. Knitting or crocheting (which can be done with whittled sticks and plant made fibers!) can produce clothing, wash cloths, blankets and even nets for fishing. Wood working can make utensils (for eating and cooking), bows and arrows for hunting and improve your shelter!
Include some goodies in your preps. Candies or chocolates, stored in cool dark locations, can last almost indefinitely. I’ve seen freeze dried candies, as well as vacuum sealed mason jars of treats. (PLEASE do not throw out chocolate that has gone white! As a former chef I can tell you that it is NOT mold! It is called bloom and it is the fat in the chocolate separating. You can eat it as is or you can melt it down and mix the fats back in.) For the adults: a small bottle of your favorite liquor might be more to your taste. Or add a case of your family’s favorite soda to help ease the transition.
Above all else, never give up hope!
Strawberry Jam – no pectin
Strawberry jam is a yearly occurrence in our house. Everyone loves strawberries (so much in fact that last year when I purchased two flats of strawberries, they were gone in a few days before I could make the jam). I always use local strawberries because the flavor is amazing (so much more so than berries that have ripened on a truck).
This is the recipe my grandmother used, I’m pretty sure it’s the Bernardin recipe, so clearly I don’t own it.
Place 8 250ml size jars (available here) on a rack in a water canner and heat to a simmer (make sure water is covering the jars). Heat snap lids separately. Keep hot until ready for use.
Bring mixture of 8 cups strawberries (crushed), 6 cups sugar and 1/3 cup lemon juice to a boil slowly. (make sure sugar is dissolved so it doesn’t stick to the bottom). Boil for about 30 minutes or until the mixture thickens and passes the ‘gelling test’. (Coat a spoon with the jam and move it away from your pot, watch the jam slide off the spoon, if it falls in chunks instead of drips, its ready).
Pour your hot jam into the hot jars leaving a quarter inch of headspace. Keep your rims clean! Place your snap lid on the jar and screw the band on until finger tight. Boil filled jam jars for 10 minutes. Pull out and let sit for 24 hours (do not move them).
Traditionally, items canned like this last for about a year (not exactly long-term food storage) but I’ve used them after the year has come and gone.

Water Ban!
On Tuesday this week, a water main broke at one of the biggest reservoirs serving our area. We were originally on a water restriction that has now been replaced with a ban. Our city still has tap water but a lot of the smaller towns right around us don’t even have that.
According to our local media, our city uses on average 140 million liters of water per day (about 40 million gallons) but yesterday, our city used 200 million liters (about 53 million gallons). People were seen watering their lawns, washing their driveways and running sprinklers for their children.
Most people in my area do not have a water storage and now a lot of grocery stores are low or out of bottled water. We haven’t had a water ban since 1998. We are surrounded by the Great Lakes so who would think you would need it, I guess is what most people think. BUT:
– this past weekend was Victoria Day, a long weekend that has long been the ‘safe point’ to start your gardening in our area. Many people that participated in the water ban now have dead plants because they don’t have a rain barrel or don’t use their grey water.
– the next town over has no tap water so no showers, no drinking water, no dishwasher and so on. Do you have enough water stored for at least three days of drinking, watering your veggie garden and giving to your pets?
The weather was 30°C (86 F ) yesterday and muggy, I can understand people want to cool down. Here’s a few ideas (based on what I saw in my neighborhood and on social media) for water conservation.
Instead of filling the pool or running the sprinkler for the kids, give them a popsicle, they’ll love you for it!
Stay indoors between the hours of 11-3 when the sun is at its hottest.
As a lesser evil, turn on your air conditioning unit rather than leaving water running.
Take a shorter shower (or use the dry shampoo recipe I gave a few posts ago)
Use paper plates or eat out of the pots that you cook in.
When you shower, leave the plug in and collect the water for use in your garden (grey water)
Buy (or make) a rain barrel (this one is similar to the one I own)
Don’t water your lawn, it will make it grow and then you have to cut it!
Moral of the story: you should probably have some cases of bottled water put aside for drinking and a rain barrel or grey water system (or both!) for your veggies.
